Thursday, September 28, 2017

RNR - Modeling, Reznik 2

Welcome, to our very first modeling post!  Modeling is such a big part of tabletop gaming, and while a lot of people seem to feel that its a bit of a burden, I enjoy it almost as much as getting the models on a table.  In fact, my very favorite part is coming up with a paint scheme for my forces.  Currently, I have two armies, my Mardi Gras themed Gator force, which uses the purple green and gold of the festival to bring a Cajun feel to the models, and my Interdiction of the Dawn Protectorate of Menoth force, which uses purple, red and grey to invoke the image of the dawn.  It takes the studio paint job of maroon, white and gold, and gives it a little twist!
Privateer Press has an amazing line of models to work with.  The attention to detail is really extraordinary.  My Idrian Skirmishers, for example, are practically covered in animal skins, totems, feathers, ammo belts (which are modeled to actually have about 10 little tiny bullets in them), medallions, and the like.  Some of them are even pretty funny, like the Trollkin that is carrying a little piggy for a post battle snack!  There are very few models in the line that I don't like, and luckily, I don't play those factions, woot!  I have a priority list of the different types of models I like working on.  At the very VERY bottom of the list are Warjacks... God, I HATE painting them!!!  Luckily for me, DTB doesn't mind, so we have a bit of a deal worked out.  He paints my 'jacks, and I paint... whatever he doesn't want to paint.  I enjoy it, because get a chance to paint a lot of things that I otherwise wouldn't get to.  So far, I've done some Legion of Everblight, the buffaloes for the Trollkin Long Riders, some pirate Mercs, and a few things for some different games, as well.  Next on the list of painting preference, units.  I wouldn't mind doing units, except that by the eighth model I get a little tired of them, haha!  I have a minimum unit of Deliverers that I painted up...
A little while later, a friend of mine gave me another four so I could field a maximum unit, but I still haven't brought myself to paint up the last four!  Next up, Battle Engines.  I love battle engines.  They're interesting, well designed, and just gosh darn fun to paint.  Almost all of them are just beautiful when finished, too.  I have two, the Gatorman Sacral Vault, and the Vessel of Judgment for the Protectorate.  The Sacral Vault took me about two months to paint.  Now, I know that seems like a long time, but my little polliwogs keep me from having any long painting time.  I can sneak in a couple of hours on Sundays during nap time, so painting time is a precious, extremely limited, commodity.  The Vessel is currently a WIP, the priest and the Idrian pulling the Vessel are complete, and now I'm just working on the Vessel itself. And finally, at the very top of my list, are solos / Warcasters.  These models I find the most visually interesting, and since there is only one of them, unlike units, I feel like I can really take my time with them, to make them very special.  And really, since the Warcaster/ Warlock is the main point of any Warmachine/ Hordes army, it's not a bad idea to really make them pop!  Which brings us to our model for today!  Both of my lists for the tournament in October are almost complete.  This is very important, as with out tourney, there are some pretty stiff penalties for having unpainted models.  While it is acceptable to play with unpainted models, someone who fields them will automatically lose their starting roll for the game.  If two people on a team have unfinished models, then the team automatically loses the team roll and forfeits the right to decide match ups!  Yikes!  So, best to have all models finished.  I already know my teammates are at full paint status, so it was up to me to finish up.  My final model that needed work was the linchpin of all my plans, Reznik, the Wrath of Ages!!!


There he is!  This is a beast of a model, being both a 'caster and a chariot.  With horses.  And three wracks.  Man!  This is gonna take a while. In order to make things easier, I left off the right and left wracks from the back of the chariot, or else painting them would be almost impossible!  Then, I primed everything with white primer.  Currently I'm using, and I kid you not, "Mr. Surface White 1000."  Hahahahahaha!  Every time I use it, I can't help thinking of the movie Spaceballs!  When I first started painting, so, so many years ago, I used black primer for almost everything, but I have realized a couple of things.  If your plan for the models is dark, then black primer is great, but white primer makes colors really pop!  And also, white primer makes it sooooo much easier to see all the little details that PP has on their models. Otherwise, I get stuck holding a model, looking at a part of it thinking, "What the heck IS that?"  White.  Easy to see.  Period.  And with my paint scheme for my Protectorate forces using some bright colors, it's the way to go!

 First things first, I had to come up with an idea of what I wanted the finished model to look like.  Wracks are some of my favorite models to use with Reznik.  Who were they before Reznik found them on his lists?  What did they do to deserve the attention of the High Executioner?  So, I decided that I wanted to explore those thoughts in this model.  Time to order a few extra bits from the PP site!
I picked up a Khador Iron Fang Kovnik shield and a Cygnar Precursor Knight shield.  I happened to have an extra Exemplar Knights Errant shield from building my Errant unit, so I threw that in there too, and boom!  Three wracked heritics.  I actually like the idea of adding one from the Protectorate to remind everyone that NO ONE IS SAFE from disrespecting the Creator of Man.  What's that, you say?  Those little troll hands?  Well, I clipped them off of a Trollkin Stone Bearer.  I needed the kriel stone he was carrying for a different project I'm working on.  I couldn't just throw them away, so I came up with a brilliant idea!  More on that later!  The shields will go on the back of the wracks, around the legs of the poor souls hanging from them, demoralizing their former comrades with their suffering.

 Next, base coating.   This is the important time to get your painting plan set.  Luckily for me, since the vast portion of my army collection is done, I already know pretty much how everything is going to work out.  When I first moved to Japan, I had to buy all of my modeling stuff from on line, since I didn't know any good gaming stores.  Luckily, I found Neal at the Warstore, and he has been my go to guy since then for all things.  I decided the best way to go about my paints was to just buy one of the big collections.  Not knowing anything about the differences between one set and another, I chose the Valejo Game Color Suitcase, which came with 72 colors and three brushes.  Like I said, I'm not really sure about other makers, but I rather like the Valejo.  No complaints from me.  I do really want to try the Privateer Press P3 paints line, but that will have to wait.  So, here we go!  For the cloth, I use Hexed Lychen, Cold Grey on the right horse, who will end up being white, and Coal Black for the left horse, who will, obviously, be black.  The metal plates of the armor on Reznik used Hammered Copper, and his little flappy cloth strips used Gory Red. 
Choosing the color scheme for the metal bits of the chariot were a little more difficult than on Reznik or the horses... I never know what to do to break up the monotony of color.  For this model, I decided to try my hand at non-metalic metals... in this case, since purple is the main color for the army, that's what I decided to go with.  Also, it's a pretty good match with the gold.  I knew I wanted the largest portions of the wracks to end up bronze/ gold, so I decided to use silver to break up the large portions of bronze and purple.  For the basecoat, I chose Gunmetal Grey, since it's a good mid range silver.  Hammered Copper went on where the gold will be, and we finished up with Bronze Flesh on the poor saps stuck on the wracks. (Oh yeah, the masks are going to be gold.  The weight just adds to the suffering, I guess).

Horsey armor time!  To keep from totally messing all the hard work, I'm basing all of the armor before I do any more work on the horses.  Much like the chariot, it's going to be a mixture of silver and gold, so it was just a matter of deciding where to place each color.  And with that, base coating is finished! 

Next, highlighting number 1!  I like to put on my first layer of highlight, and then do the shading mostly with inks and washes.  I don't know if that's lazy or not, but hey, that's how I do it!  The purple areas got a highlight of 1:1 Hexed Lychin and Bone White.  Once that was finished, I put on a coat of purple ink, to blend it together and bring out the shadows.The bronze sections received a highlight of Brassy Brass, Bloody Red on the strips.  Chainmail silver went over the gunmetal, and all the metal got a wash of black ink.  Once it was dry, I brushed up the bronze areas with a thin layer of Brassy Brass, and the silver portions with Shining Silver.  That left me with the little horses and the poor schmucks up on their wracks.
The soon to be white horse was touched up with Cold Grey, and the black horse used a 1:1 Coal Black and Cold Grey.  As for the wracks, they got a wash of smokey ink to bring out all the great detain in their tortured bodies.  I decided to go ahead and do their loin cloths.  To push the idea of their different origins, I thought it might be fun if their loincloths had been torn off of their previous uniforms... so the Khadoran got outfitted in red, while the Cygnaran is swaddled in blue, and the fallen knight in the middle will be in white.  Since the Protectorate is set in the desert, when I use white with them I like to have a yellowish cast to it.  Kind of makes me think of sand, and the harsh environment of the holy land. To achieve this, I base the white parts in  Bad Moon Yellow.  Then I throw on a coat of Cold Grey, followed by a highlight of Dry Bone, and at long last, a final highlight of Bone White.
Poor, tortured souls.  We can only hope their suffering keeps Reznik safe as he rides into battle!

Time for the armor.  I already based it while I was finishing up the fabric and the wracks.  For the silver, I use several different shades and brushes to randomize the look of the silver.  It gives it kind of a weathered feel... I like it!  For the gold, I have already laid down a base coat of Hammered Copper.  A first highlight of Brassy Brass went on, and then a wash of black ink.  Once that was dry, another coat of Brassy Brass went down, and then a final highlight of Polished Gold to finish the armor plates.
Woooo, shiny!  Here is a man full of righteous wrath!  A few final touches, and the model will be ready for basing!  One of the last things I like to take care of is the red touches.  I don't like to use a lot of it, because too much will draw away from the main effect of the paint scheme.  The menofixes and the haft of the spear will be red(along with Reznik's prayer strips that I already mentioned), that should be enough!  A base of gory red is a good place to start, with a highlight of Blood Red, and BAM!!!!  beautiful red!  Chains and such were next... bronze chains with the horses and the wracks, silver chains wrapped around Reznik, along with the incense burners that dangle from him.  And at long last.... at long last... it was finished!
The final step for every model, basing!  All of my Protectorate models are based to look like they are on the stone floor of a temple, or gathered in the courtyard in front of one.  Some days I have a very ambitious plan to make a diorama with my forces, but let's be honest... that's probably not gonna happen anytime soon, haha!  The base starts with Somber Grey.  Next, I make the stone shapes with a 1:1 mixture of Somber Grey and Cold Grey.  Next, with only Cold Grey, I fill in the stone shapes, leaving an outline of the previous color.  And finally, I use Stonewall Grey and drybrush a little texture onto the stones.  It adds some interest, and also blends together the two colors of the stones.  Lastly, for Warmachine, all models need to have arc markings.  We need to mark a 180 degree arc to show the facing for the front and back halves of the model.  This can be anything, even just a slash of color, but, I like to do something a little different.  On my Protectorate army, I use Menofixes to denote the front facing (i.e., where the model is looking) and both of the two marks for the 180 degree arc.  I do the marks by hand, which is always tricky... sometimes they come out a little lopsided, but overall I think it really adds to the feel of the army.
With that done, the model is officially finished!  Now, to customize!  First of all, the shields that I had prepared go on the back of the wracks!  I kind of like how it turned out!  It's easy to see the effect I was going for, that these victims who protect Reznik come from all over the Iron Kingdoms.  Now... for the final touch!
Boom!  Hahahahaha!  Where did those Trollkin hands from before get to?  Why, there they are, being crushed beneath the wheels of the chariot!  And what are crushed hands without a little pool of blood beneath them?  I can't wait for DTB to see this!

Well, there you are!  Reznik is ready for the table, in all his shiny glory!  Ride forth, Wrath of Ages, and smite the wicked in Menoth's name!

Thursday, September 14, 2017

Widower's Wood, Chapter Two

Gather 'round, everyone, and get ready for chapter 2 of Widower's Wood, the Privateer Press board game based on their wildly popular miniatures battle game.  Last month, the Fukuyama Gaming Club challenged the first chapter of the campaign.  We did well, in that we managed at the very last second (and I mean, like, the very last dice roll of the game), but it was a near thing.  I couldn't wait to give it another go and see if we couldn't do better the next time!  We did learn some big things through our mistakes last game though!
#1 - Do not underestimate how quickly the game turns run out!
#2 - Make sure to read the rules!  (haha, of course!)
#3 - Support characters and fighting characters should pair up and then stay together.

So, with this in mind, we set forth to continue in our quest to save the Widower's Wood!

The Story So Far:
Last time, our four heroes made their way through the woods to the evil witch doctor Rasheldonak's former village in the hope of finding clues to what the crazy Gatorman was up to.  However, on arriving at the village, they were ambushed by a tribe of Bog Trogs being led by a fierce, axe wielding Gatorman.    At the last possible second, our heroes (and more specifically, our porcine heroine, Agata) brought down the Gatorman, freeing the Trogs that were being pressed into service.  Turns out, the Gatormen are using the Trogs' mates and children as hostages to force them to fight against any who might stand against Rasheldonak.

So, first things first!  We had to spend our XP from last game... Agata and Vaskis decided to save up and buy something really great after the end of Chapter 2.  Olo purchased some Extra Shells to bump up his Armor rating, and Skarg bought Bow Spikes to add a little more punch to his melee attacks.
Some XP for you, and XP for you!
I took control of my girl, Agata, in all her piggy glory, while DTB took over control of Olo, Leland retained control of Vaskis, and we gave our new friend Matt Skarg.


Chapter 2:  Fish or Cut Bait
The four heroes have decided to help liberate the Bog Trog village so the Trogs will help them against Rasheldonak's evil plans.  Okay, so not all the heroes.  Okay, so maybe just Olo.  Who turns out to be the good guy of the group, and something of a softie. The defeated Trogs explain how the rest of the Gatormen are hoping that Rasheldonak is going to try and take over the whole of Widower's Wood now, and is gathering the lesser peoples of the swamps to help him!   Olo decided to help the Trogs, even thought Skarg couldn't care less about helping them, Agata wants to kill them all since it turns out they were the ones that destroyed her tribe, and Vaskis isn't saying one way or the other.  But looks like Olo is the leader of this motley crew, so off to help the village they go.

So, there you go!  Our intrepid heroes are off to save a some Trogs!

Our board is set and ready.  Okay, so in this scenario, the four heroes have to convince the Mist Speaker that they should join our group against the Gatormen.  Once a character is in the same space as the Mist Speaker, he can roll INT + 2d6.  On an 11 or 12, they convince the Mist Speaker to join them, and he will start to move towards the exit.  On a 13 or better, he is so convinced that he immediately is removed from the board, and extra XP is given to the group.  The finale of the game begins at the end of the 4th turn, when a Gatorman Bokur and 4 Swamp Shamblers are spawned.  Kill the Bokur, win the game!  Plus, after the Mist Speaker leaves the board, the other Trogs will try to follow.  If 5 Trogs escape, the party gets a bonus!

Determined to make a good showing of ourselves, we decided to team up Olo and Skarg, and Agata and Vaskis as we try to get the Trogs to safety.  Of course, as with all things, everything started going pear shaped right away.  At the beginning of every player turn, an event card is flipped, setting the tone for the turn.  Some are good, giving bonuses for certain skill checks, some are neutral, like Omimious Silence, which has no special effect.  And of course, some are bad.  Really bad.  And of course, at the beginning or turn 1, we flipped the Menacing Ripples card.  When this card hits the table, everyone rolls, and a Gatorman spawns in the water nearest to the person who rolled the highest.
Swamp monsters on Patrol
Normally, this wouldn't be a big problem.  There were four Gatormen on the board already, and four in reserve.  Plenty!  But.... and here is the kicker... if two people tie on the roll, then a Gatorman is spawned for both of them.  And Matt and Leland tied!  Uh-oh!  Two more gators on the board, and only two left in reserve.  Remember...if all the models from the reserve are in play, when you would spawn that model, instead of spawning that model gets an activation, which can be oh so very bad!  Fingers crossed we can kill off a couple of Gators before they spawn again!
Shhhhhhhh.... did you hear that?
Well, nothing we can do about the event card!  Time to get down to business!  Agata was given the job of keeping the exit area clear, since models can't leave the board if there is an enemy model in the exit square.  Olo made for the Mist Speaker, in order to convince him to join up, and Skarg followed him to try and keep them safe.  And Vaskis started working his way towards one of the side quest cards.  We didn't manage to pick one up last game, and we're hopeful to snag one this time around.
Can we get to the Side Quest?  Only time will tell.
Sadly, during the spawning phases, both of the last Gatormen were put on the board.  That is really, really not good.  And then, disaster.  The Villian Activation card indicated that one of the Gatormen charge the huddle of Mist Speaker, Skarg, and Olo.  Skarg did manage to kill it, but not before it took a couple of swings at the Mist Speaker (in this chapter, the villains will always target the Trogs before the player character.  Sheer luck saw the Mist Speaker survive, though, so we still have a chance for a victory! (The game automatically ends and the players lose if the Mist Speaker dies.)

The Widowers Wood is a dangerous place
On the next turn, a lucky break!  Ominous Silence reigns, so no extra difficulty there!  Olo managed to convince the Mist Speaker to come with us, but he didn't roll high enough to simply remove him, so the Mist Speaker made his slow way off the board, with Agata watching over his retreat.  The rest of the Bog Trogs will only start to move towards the exit once the Mist Speaker is safe, so we really really need to get them to hurry up if we want the bonus!  Luckily, the Mist Speaker managed to get out of town, just as the Bokur spawned.  And another spot of luck, he spawned as far away from the exit as possible!  Come on, Trogs, let's get out of here!

A Bokur and his Shamblers
And.... that's when the good luck ran out.  Another Menacing Ripples card was played, and two people (myself and Vaskis) tied again!  Thus, putting out the two gatormen that Agata had managed to kill off.  And then, another Villain activation card made them activate... and activate.... and again.  Man!  We could not catch a break from taking attacks from Gatorman.  The Bokur also had an activation, doing some serious damage to Skarg, but luckily Vaskis was on hand to help heal him up a little bit. 

Olo decided to be the hero we all know he is and moved up into danger to try and glue the Bokur into place to get Skarg into position to kill him.  He took a couple of hits from Gatormen, but he's a pretty slippery guy, and his high defense kept him safeish.  Guess it must be that rubbery skin of his!  We managed to get three Trogs out the exit, but it was quickly becoming clear that getting all 5, just like trying to reach the Side Quests, was just not going to happen this time around.  We realized that we had two options.  One, we keep doing what we're doing and try to get the last two Trogs out the exit and getting Vaskis to the Side Quest, but  if we did that, we ran the risk of running out of turns.  Or two, we say to boo to all of the extra stuff, and just try to kill the Bokur and secure a victory.  But it turns out all of our debate was moot anyway.  In the very next Villain activation, two Trogs got shot up by some Swamp Gobber Pirates, and all of a sudden, we didn't have five Trogs to rescue.  Well, that sure made things easier.  Time to kill us a Bokur!
Can you see him now, Skarg?
This time, our plan worked seamlessly!  Olo "Flared" the Bokur, making him an easier target.  Skarg used as many feat cards, abilities, and tricks as he could to bump his stats, and shot an arrow deep into the Bokur, ending his control of the Shamblers on the board, and his life.

VICTORY!!!!
Smoked Bokur jerky for dinner tonight, boys!
Conclusion:
Yeah!  We did so much better this time around.  While we got a little back footed by running out of Gatormen in the reserve on the first turn, we managed to keep up with the pace of the game.  Our healer did a great job making sure the other characters were in fighting trim, and we, in turn, kept him safe as well.  While we still didn't have things in enough control to grab the extra bonuses avaliable, I think we'll be able to make a good run of it next chapter.  Great time, guys!  Thanks for a fun time.  Next month.... SIDE QUEST SUCCESS!!!!

If all things go well, we'll be able to play through the next chapter this coming Sunday, September 17th.... if we can have our meeting.  Typhoon 18 is making its way towards us, and is supposed to arrive just in time to ruin our game day.  So, fingers crossed everyone!  Shoo this typhoon away, so we can play!!!

Saturday, September 2, 2017

AAR - Trolls Vs. Protectorate, Troll's Revenge

Another month gone by, another great meeting of the Fukuyama Wargaming Club!  And, another huge gaming event held in the US!  Yes, our meeting on the 20th coincided with GenCon, possibly the biggest gaming convention in the US (not just Privateer Press, but all kinds of gaming shenanigans).  In fact, several years ago our very own DanTrollBlitzer went to GenCon and took 5th place in their Hardcore tournament with his (now retired) Cygnar army.  In a perfect world, I would very much like to head to GenCon one of these years, but the realities of living in Japan with two little polliwogs means that I probably have only one shot (baring making it onto one of the Japan teams for the World Team Tournament) at heading to a gaming convention, and for that, Lock and Load has my heart.

This month, we got to greet a new guest, Matt!  Sadly, he doesn't live near us, being much further east towards Tokyo, but he is a good friend of Leland, and perhaps can make the trip to us once or twice a year... yay!  We had a GREAT time with him. He's a good sport, and was even willing to take on Leland's finished Cygnar army with a borrowed Cryx force... at 75 points, no less!  That takes courage!  A brand new player taking on such a hefty large force?  You are a true gamer, my friend!  Come back soon!  And often!  With the Japan Open Team Tourney a mere 7 weeks away, sadly neither DTB nor I were able to get a game in with him... we are on full tourney mode, which meant two matches against the Trollkin for our intrepid Kommissar!  Much like myself, it seems that DTB has decided on his two lists, so he ran each one, while I countered with my anti-hordes list, led by the executioner, Reznik, the Wrath of Ages! 

The forces for today's battle!
DTB's Doomshaper 3 list, or "That's alotta Troll!"

Army List:  Trollkin, controlled by DTB.  This list uses the Power of Dhunia theme force, which gives all beasts threshold +2, some free models, and the ability to start the game with upkeep spells in play!
     Warlock:  Doomshaper 3/ Scroll bearers
     Mountain King
     Mulg
     Mauler
     Earth Born Dire Troll
     Axer
     5 Whelps (free due to theme force)
     Trollkin Shaman X 2 (both free due to theme force)
     Stone bearer Minimum unit

Kommissar Koala's Protectorate of Menoth list, "Your Flesh is Weak!"

Army List:  Protectorate of Menoth, controlled by Kommissar Koala.  Hordes, beware!  Your flesh... is WEAK!!!
     Warcaster:  Reznik 2
     Heirophant
     Scourge of Heresy
     Blood of Martyrs
     Avatar of Menoth
     Guardian
     Revenger (today proxied by the Blessing of Vengeance, since DTB stole my Revenger to help him
            paint up a new light 'jack for me... Yay!
     Idrian Skirmishers
        +Chieftan and Scout
     Choir of Menoth Minimum unit

 The Recon scenario was randomly decided, with a rectangular zone able to be scored by Warbeasts/ Warjacks in the very center of the table, flanked by a circular zone on each side, capable of being scored by units.  In the Steamroller 2017 rules, Warcasters and Warlocks can score any zone, but cannot contest anything, and solos can only score on flags.  First player to five points more than their opponent wins.  Next, the roll to go first came, and DTB won.  He opted to choose the board edge, which meant, much to my despair, that I was going to go first.  Man!  I HATE going first.  Ruins my whole plan.

Setup:  Protectorate of Menoth
I'm lookin' at you, Doomie!
Okay, setting up first.  Well, I had that rubble area to my right, so I decided to put Reznik over there, since huge based models have natural pathfinder.  The Heirophant went to his right side, since he doesn't have to move too fast, so getting into the rough terrain wouldn't be too terrible, and also to keep him out of the way of everyone else.  Then, the jacks set up.  I like to keep the Avatar off to the opposite side as my caster, since he doesn't need to stay in control area, and if I need to keep anything away from Reznik, I can Menoth's Gaze it to keep it from getting closer to him.  Then, the Guardian, Blood of Mayrters, Scourge of Heresy, and Revenger lined up, with the choir filling in between them.

Setup:  Trollkin
Trollies smell hoooman snacks
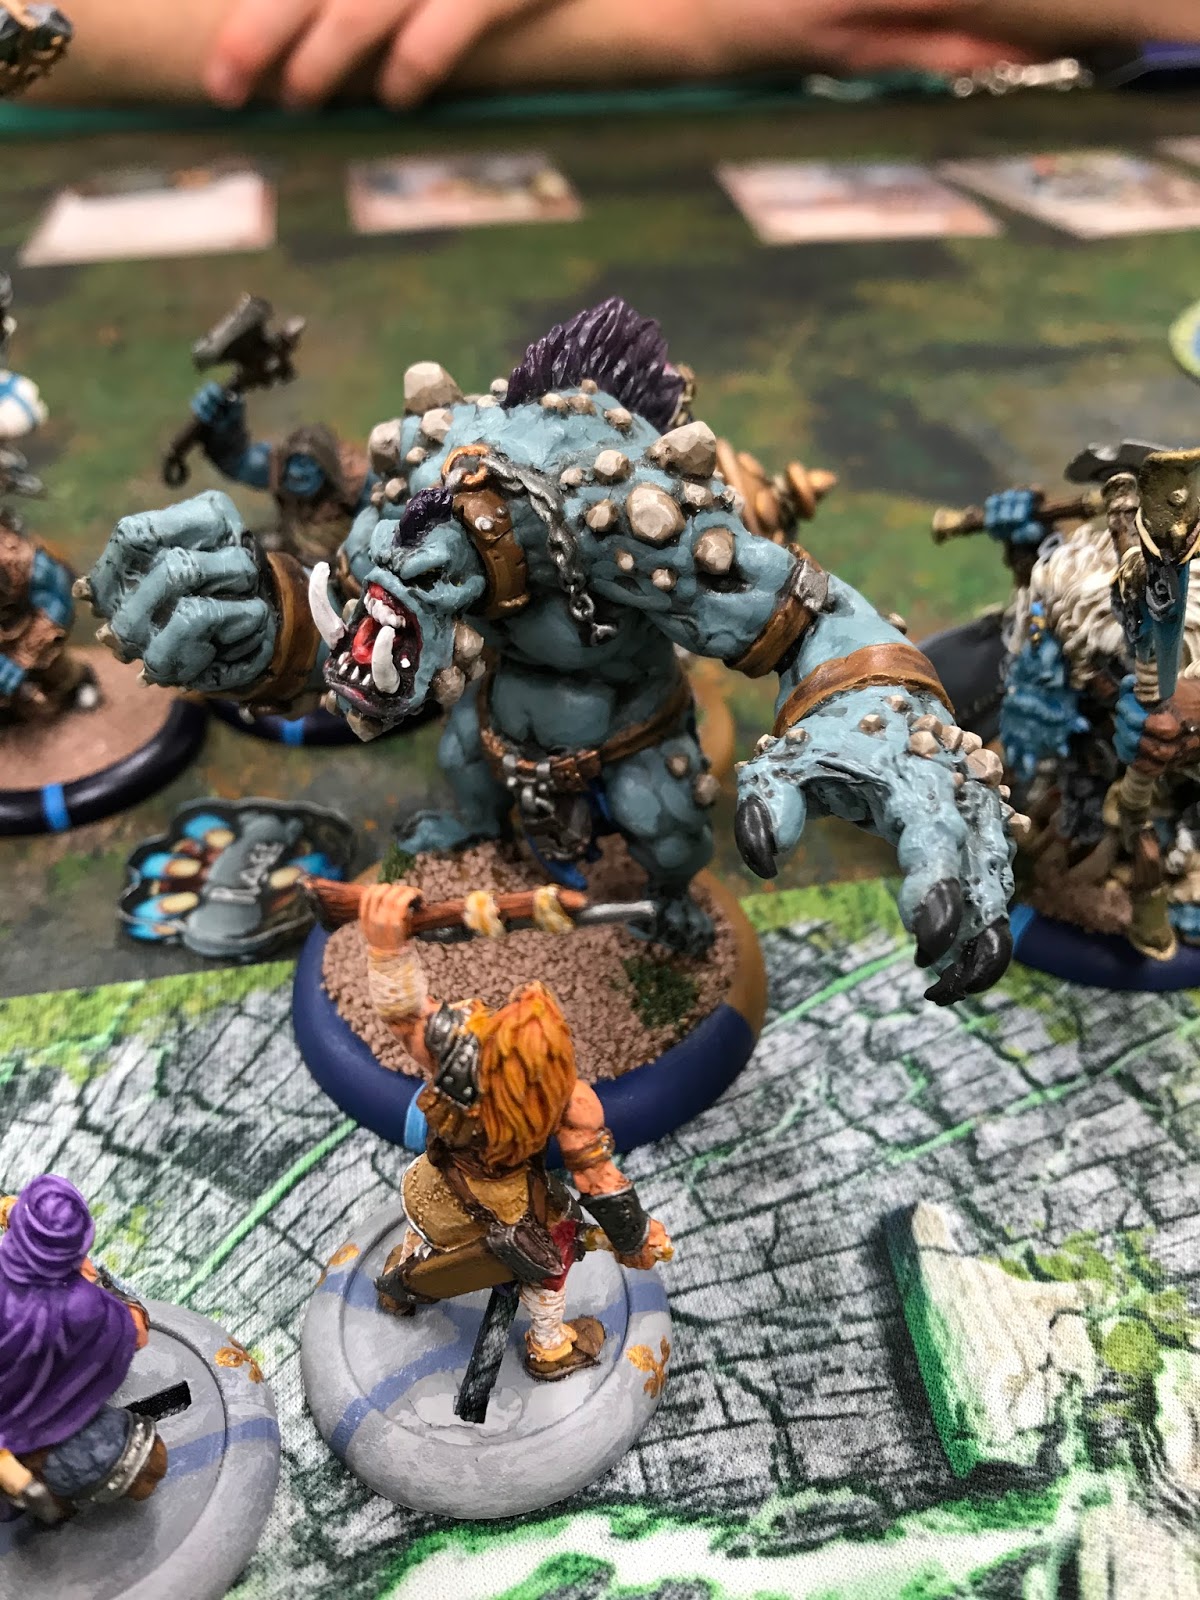
This is a very small force, but it really packs a wallop!  Not to mention Doomie 3's feat, which is one of my most hated IN ALL THE GAME!!!  Basically, it takes your turn, and goes, NO TURN FOR YOU!!!  Grrrrrr... I know it's coming, and there's nothing I can do to stop it!  Oh well... anyway, Doomie 3 went in the center, with the Mauler, Mulg, and the EBDT to his left, and his little Scroll bearer buddies on his right.  Next to them, the Axer and the Mountain King got ready to bring Dhunia's justice to the Protectorate!  Behind Doomie, the Stone Bearer's lined up, with a Northkin Shaman on each side, and the whelps filled in where they could.

Advanced Deployment:  Protectorate of Menoth
As per usual, the Idrians went out in front to screen as much of my force as possible before they are utterly destroyed.  Good luck boys!  They chose the Shaman on the left side to be their prey.


Advanced Deployment:  Trollkin 
None!  So sad....


Our Story:
A small force from the Interdiction of the Dawn, as they return to the Protectorate from Lern, descends upon a Trollkin village.  Reznik has heard that the chieftan of the village has decried the creator of man, and has added his name to his Orders of Execution.  Doomshaper has appeared to save the village and the life of the chief, and send the Interdicton of the Dawn back to Imer without their prize.
DTB starts the game with his signature move!
Round One:  Protectorate of Menoth
I must to run!  Yes, the Idrinas ran forward towards the center of the board.  The Avatar received 4 focus from the Creator, and used one to run forward, and another to cast Menoth's Gaze... because, why not, right?  The four other jacks also ran, the Revenger heading to the other side of Reznik, being careful to stay out of the rubble.  The Choir moved forward and prayed for passage on all the jacks except the Revenger.  The Heirophant moved up and put Harmonious Exaltation on Reznik, who moved up, and since he was just out of range, used the Guardian's arc node to put Death March on the Idrians, and then put Lamentation on himself.

POM must to run
Round One:  Trollkin
The Earth Born Dire Troll kicked things off by riling and running forward.  Mulg also ran, and two of the whelps followed their big brother protectors.  Doomie activated and put Rush on the Axer and the Mauler, then Admonition on the Mauler (that's a lot of spells!), and then failed a charge on the Scourge to sneak in an extra 3 inches of movement.  The Mauler continued the run trend, and with Rush on him, made it an impressive 12 inches, right into the Idrians!! The Axer put rush on the Mountain King, and then walked towards the zone.  The Mountain King ran right into the edge of the zone and into base to base with more poor Idrians.
Uh, guys?  I think we need bigger guns!
The Shaman on the right ran forward, and the Stone Bearers moved up behind Doomie.... but OH NO!!! Looks like Doomie forgot to put any fury on the stone!  No aura of protection this turn!  The last whelp on the table ran up behind the Mountain King, and the left hand Shaman followed it behind the Mountain King.
Poor Idrians!  Stand firm, boys!

Round Two:  Protectorate of Menoth
I upkept both spells and allocated one focus to the Scourge, while Menoth granted three focus to the Avatar.  The Idrians moved to get lined up for a shot into the prey Shaman... and activated Admonition!  Oh NO!!!  I knew better than to do that.... ugh.  So, anyway, the Mauler took his movement and tied up the Idrians that were going to take the shot.  Only two Idrians were left free, so starting with the Scout, he lined up a shot on the prey Shaman, dealing two damage, and the other took a shot at one of the Stone Scribes, but missed.  The Chief called out to his boys to Go To Ground, hoping to make it through until next turn.  The Revenger ran into the zone behind the Idrians, the Guardian ran into zone as well.  The Avatar ran forward into the left hand zone, and again used Menoth's Gaze.  The Heirophant moved up and put Harmonious Exaltation on Reznik, who then moved up and cast the Flesh is Weak on Mulg, but did no damage, and repositioned three inches back.  The Blood of Martyers ran forward, and the Choir finished up, shielding the Guardian and the Blood of Martyers.
Come get some!
Round Two:  Trollkin
Doomie leeched all fury he could, and decided not to upkeep any of his spells.  He was still a little over, so Mulg ate a whelp and got rid of the excess fury.  Doomie then activated, and the very first thing he did was feat!  DAMN!!!  My next turn is going to be a real pain in the boiler.  Like I said, knew it was coming, nothing I could do about it.  Then Doomie cast Rush and Admonition on Mulg.  The Scroll bearer hid behind the Mauler as Doomie charged an Idrian, boost to hit, boom squish!  He then used the Scroll of the Hand of Trogal, and ended his activation.... but it feels like he forgot something... hmmm, what could it be.  Oh yeah!  He forgot TO LOAD THE STONE AGAIN!  Phew!  That is a lucky break for me.  At least there is one small ray of hope for my next turn.  The Axer walked forward next to the Mountain King and used Thresher.  He put 5 damage on the Mountain king himself (and the king looked at that Axer like he was going to be an after battle snack, let me tell you!), and two Idrians, the Chief and the Scout also got threshed to death.  Not my Chief!  As he goes poof, so does the prey token on the shaman.  Dang!  The Mountain King walked out of combat (no damage on the free strikes), and into base to base with the Avatar, whom he proceeded to pummel to death.  Hmmm.... I believe that I should have done that differently, the poor Avatar went out waaaaaay too cheaply.  The right side Shaman sprayed the Revenger, catching an Idrian as well.  The Idrian died a horrible death, but the Revenger was fine.  The Stone Bearers moved up right behind the skirmish line, and the EBTD used Elemental Communion to get a little extra movement and slammed the Scourge of Heresy.... ONE INCH!!!  Phew!  I know he was trying to slam it into Reznik, so luck was with me there.  Mulg walked up to an Idrian, punched him into a squishy paste, then clubbed the Revenger into a crushed can.  He finally  cast Arcane Suppression on himself for free (thanks, FEAT!!!)  The left Shaman walked into base to base with Doomie, made a cloud, and teleported into the zone.  The last 2 whelps ran, one into the right zone and the other into the left zone protected by the Mountain King.  Whelps control 2 zones!  THE CHEESIEST MODELS IN THE GAME, hahahahaha!

(EDIT EDIT EDIT!!!  after the came finished, we realized that Whelps, as solos, can not control the zones that are claimable by Beasts.  So, for this game only, the Whelps can take zones!  Big day for little whelps!)
When a Dire Troll looks at you like you're a snack

Round Three:  Protectorate of Menoth
VENGEANCE!!!  Plink, plink, plink.  I let Death March expire, since I'm pretty sure that there will be no more Idrians after this turn.  I did upkeep Lamentation, but I had to pay 2 focus due to Doomie's STUPID FEAT!!!  The Blood of Martyers and the Scourge of Heresy loaded up on focus.  I know, it's super hard to kill stuff on the Doomie feat turn, but if I just sit around and do nothing, this game's going to be over really soon!  Reznik cursed the EBDT, and then FEAT!!!  Take that, Doomie!  He finished his activation by retreating 3 inches back.  Okay... now I've GOT TO KILL STUFF!!
 
 The Choir moved behind the jacks and prayed for Battle!  Cause every little bit is going to help.   The Idrians finished off the Shaman that had been their prey.  The Scourge stoked his heartfire, stood up, and Bashed the EBDT TO DEATH!!!!  Yeah, that was a good start.  Then, decision time.  The Blood of Martyers is a super star when he finally gets into combat, especially when a friendly warrior has died within 5 inches of him.  So, I'm pretty sure he can take out either Mulg or the Mauler, who forgot to activate last turn.  I just have to decide which one is more of a threat.  Are you paying attention, dear reader?  Have you seen my rookie mistake yet?  You're about to!  I decided Mulg posed the greatest threat, and he was standing in a beast Zone, so I decided to send the Blood after him!  Spent one focus, CHARGE!  And in doing so, I ACTIVATED ADMONITION ON MULG, WHO MOVED OUT OF THE WAY.  D'oh.  I mean, really.  I have Admonition myself in my other list.  I know that spell!!!  How did I do that!  Ugh....so instead of taking out the Mauler, which would have been totally doable even in DFT (Doomie Feat Turn), I instead wasted the activation of my most potent fighting jack.  Yay.  The Guardian stepped in, trying to salvage this turn, attacking the Axer.and doing a piddly 3 damage after the regeneration effect of the feat.   At least the Blood of Martyers was now contesting the right zone, but the little whelp next to the Mountain King was still controlling the left zone, so one more CP to the Trollkin, bringing the total up to 3-0.
Uh, sir.... did you mean to do that?
Round Three:  Trollkin
Doomie leeched all his fury, and the Trollkin turn began.  The Axer moved around the Idrian to contact as many as he could and used his thresher attack.  Two more dead Idrians, three left on the board, hanging onto that middle zone as hard as they can!  The Shaman grabbed another Idrian by his ammo belt, and thrashed him into a little broken pile of bones.  Doomie moved back a little, put Rage on the Mauler and Admonition on himself (making sure I can't make a last ditch effort at an assassination run), and FINALLY remembered to put 3 fury on the Stone!
Some fury for you, and some fury for YOU!
The stone moved forward and formed a protective ring around Doomie and used one fury for Protective Aura.  Mulg walked into combat with the Blood of Martyers.  6 attacks later, one dead warjack.  And with that, those two little whelps took another two control points, giving DTB 5 more than I had (5-0, yeesh!) and the game.

Superstars of the game?  WHELPS!
Conclusion:
Victory for the Trollkin!  As his last jack fell, the executioner slightly inclined his head at the ancient shaman of the Gnarls, part respect and part promise of another encounter in the future, before turning his chariot and leading his remaining troops from the village.

But I didn't get to eat him!!!
I wish I could say that this was a great game, but sadly, I made WAY WAY WAY too many foolish mistakes.  DTB was a great opponent, and I really enjoyed watching his blue skinned barbarians whomp the Creator out of my forces!  Let's face it, the Trollkin are truly the good guys of Western Immoren!  I do think it was funny that the Mountain King, after killing the Avatar, never even turned around to face the rest of the battle.  Like, he was so busy eating the scrap of the Avatar that he couldn't be bothered with the rest of the battlefield.
Nomnomnom
Hahaha, silly Mountain King.  Thanks, DTB, for letting me make soooo many mistakes now instead of at the tournament!  My Kommissar's Cap off to you, sir!  I look forward to facing off against the Trollkin again soon.

Fukuyama Gaming Club is meeting again September 17, then the Tournament on October 8, free gaming on October 9, and another regular meeting again October 29!  Come and get a game!